3 Simple Zones That Actually Stay Organized
If your utensil drawer is a jumble, food keeps disappearing into the back of your pantry, and vegetable scraps somehow always end up sitting on the counter, you probably don’t need a bigger kitchen.
You need three better zones.
The good news? You don’t have to organize every cabinet, buy matching containers, or spend an entire weekend decanting food into jars.
Start with the three areas that create the most daily frustration:
- Kitchen drawers that turn into a pile of small tools
- Deep pantry shelves where food gets lost
- A food-waste area that doesn’t have a convenient home
Get those three areas right, and your kitchen can feel noticeably calmer and easier to use.
The 3-Zone Kitchen Reset
Here’s the simple system:
Zone 1: Drawers → Divide by use
Zone 2: Deep pantry → Pull food forward
Zone 3: Food waste → Keep it within arm’s reach
That’s the entire strategy.
Everything below simply helps make those three zones work in a real kitchen.
Zone 1: Organize Kitchen Drawers Without Wasting Space
A messy kitchen drawer usually isn’t a sign that you need more storage.
It’s usually a sign that too many unrelated things are sharing the same space.
Start by emptying the drawer completely.
Yes, everything.
Then make a few simple groups:
- Everyday utensils
- Cooking tools
- Measuring tools
- Small kitchen gadgets
- Food storage supplies
- Items that don’t actually belong in the kitchen
Now look at what you use regularly.
The goal isn’t to create a perfect compartment for every object.
The goal is to create usable zones based on how you cook.
What Belongs in Drawers vs. Cabinets?
A simple rule helps:
Drawers are best for smaller items you reach for often.
Cabinets are better for larger, bulkier, or less frequently used items.
Good drawer items:
- Spatulas
- Tongs
- Whisks
- Measuring cups and spoons
- Peelers
- Can openers
- Small kitchen gadgets
- Food wraps and bag clips
Better cabinet items:
- Pots and pans
- Mixing bowls
- Large appliances
- Serving dishes
- Large baking pans
This one decision alone can prevent drawers from becoming overcrowded.
Measure Before Buying Drawer Dividers
This is one of the most common kitchen organization mistakes:
Buying the organizer first and measuring later.
Measure the inside of the drawer:
- Width
- Depth
- Height
Then choose dividers or organizers that fit the actual usable space.
You don’t need lots of tiny compartments.
A better setup might be:
- One section for everyday tools
- One section for measuring tools
- One section for small gadgets
- One flexible area for awkward or oversized utensils
If your cooking tools slide into one messy pile every time you open the drawer, an expandable organizer helps create sections around the tools you actually own.
The advantage is flexibility.
You aren’t stuck trying to force mismatched utensils into fixed compartments.
SHOP THIS SOLUTION
Expandable Kitchen Tool Drawer Organizer (paid link)
One Drawer Rule That Makes Organization Easier
Before putting anything back, ask:
Would I look for this in this drawer?
If the answer is no, it belongs somewhere else.
That sounds obvious, but it’s the difference between organizing a drawer and simply giving clutter a nicer container.
Zone 2: Organize a Deep Pantry So Food Doesn’t Disappear
Deep pantry shelves can look organized from the front while hiding a small grocery store behind the first row.
The problem is access.
When food is stored loose in deep rows, you can see what’s in front—but not what is hiding behind it.
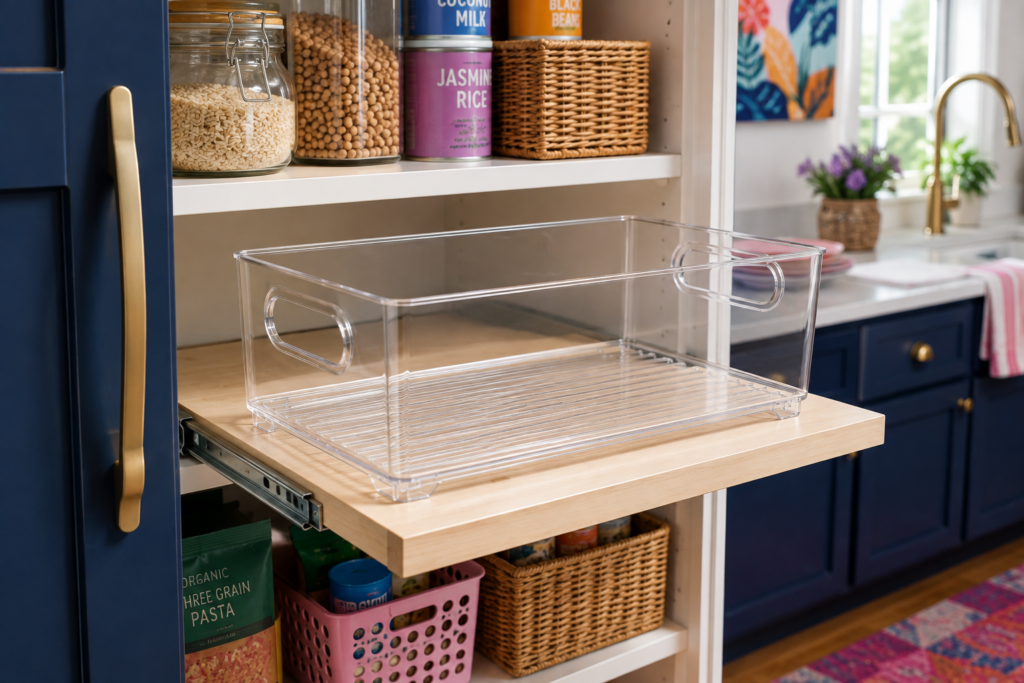
The simplest fix is to make the shelf behave more like a drawer.
Use Clear Pantry Bins to Pull Food Forward
Clear pantry bins are especially useful for categories with lots of smaller packages:
- Snacks
- Breakfast items
- Baking supplies
- Pasta
- Packet mixes
- Lunchbox food
- Sauces
Instead of reaching around everything, you pull the entire category forward.
That makes it easier to see what you already have.
It can also help reduce the frustration of buying duplicates because something disappeared at the back of the shelf.
A clear handled bin works well for deep pantry shelves because you can group one category together and pull it forward like a drawer.
It’s especially useful for snacks, packets, and smaller pantry items that tend to disappear behind larger boxes.
SHOP THIS SOLUTION
Clear Kitchen Storage Bins (paid link)
Clear Bins vs. Baskets: Which Should You Use?
Use clear bins when visibility is your biggest problem.
Use baskets when you already know what’s inside and want a calmer visual look.
Clear bins are great for:
- Snack bars
- Pasta
- Baking ingredients
- Packets
- Lunchbox items
Baskets are great for:
- Potatoes
- Onions
- Reusable bags
- Kitchen linens
- Larger packaged items
You don’t have to choose one or the other.
The best pantry systems often use both.
A mixed-size bin set can make more sense than buying identical containers for every shelf.
Different pantry categories take up different amounts of space, and a variety of sizes gives you more flexibility as your grocery habits change.
SHOP THIS SOLUTION
Kitchen Storage Baskets (paid link)
Use a Turntable for Bottles and Jars
Turntables are especially useful in deep shelves and awkward corners.
They’re a good solution for:
- Oils
- Vinegars
- Sauces
- Condiments
- Spices
- Baking extracts
- Small jars
Instead of moving everything in front, you rotate the category until you find what you need.
If bottles and jars keep getting pushed behind one another, a turntable can make a deep shelf much easier to use.
This works best when several smaller items share the same category.
SHOP THIS SOLUTION
Cabinet Turntable (paid link)
How to Keep Pantry Products From Getting Lost at the Back
Once your pantry is organized, use these four simple rules.
1. Keep Categories Together
Don’t store pasta in three different places just because there happened to be room.
Give each category one home.
2. Put Everyday Items at Eye Level
Keep the things you use constantly in the easiest-to-reach area.
Use higher and lower shelves for:
- Backstock
- Seasonal ingredients
- Specialty items
- Less frequently used food
3. Put Newer Products Behind Older Products
When you bring home groceries, move the older version forward.
Place the newer item behind it.
Simple, but effective.
4. Pull Deep Categories Forward
If you can’t see the back half of a shelf, don’t create two or three loose rows.
Use bins, baskets, turntables, or another pull-forward solution.
If you can’t see it or pull it forward, you probably won’t remember you own it.
Zone 3: Create a Food-Waste Station That Doesn’t Take Over Your Counter
Food waste becomes frustrating when there isn’t a clear place for it.
Then vegetable peels end up:
- On the counter
- In a bowl beside the cutting board
- In the sink
- Mixed into the wrong waste bin
The easiest solution is a small, dedicated food-waste container located close to where you prepare food.
Depending on your local rules and waste system, that might hold accepted food scraps for composting or collection.
Keep Your Food-Waste Container Within Arm’s Reach
The best location depends on how your kitchen works.
On the countertop
Best if you cook frequently and want the easiest access.
Under the sink
Best if you want it hidden but still convenient.
Beside the main trash and recycling area
Best if your household already sorts waste in one location.
The most important rule is simple:
Don’t put it somewhere annoying to reach.
If you have to walk across the kitchen every time you chop vegetables, the system probably won’t last.
For a smaller kitchen or household, a compact food-scrap bin is often enough.
It can be easier to keep on the counter without giving up too much prep space.
If you cook frequently or have a larger household, the bigger size gives you more capacity.
The right choice comes down to how often you cook and how often you realistically empty the bin.
SHOP THIS SOLUTION
Compost Bin, 1.3 Gallon (paid link)
or a slightly smaller option If you cook less frequently or have a smaller household.
The right choice comes down to how often you cook and how often you realistically empty the bin.
Compost Bin, 0.8 Gallon (paid link)
How to Choose the Right Food-Waste Container
Before buying one, think about four things.
Your Household Size
One or two people may prefer a smaller container they empty frequently.
A family that cooks most meals at home may need more capacity.
Where It Will Live
Measure the space under your sink or beside your prep area before buying.
How Often You’ll Empty It
A smaller container can actually work better if it encourages you to empty scraps before odors become a problem.
The Biggest Kitchen Organization Mistakes to Avoid
Buying Organizers Before Measuring
Measure the usable interior space first.
Organizing Clutter Instead of Removing It
Sometimes the problem isn’t the drawer.
It’s six duplicate peelers.
Creating Too Many Categories
If you have to stop and think about where something belongs, the system may be too complicated.
Decanting Everything
Decanting can be useful, but only when it improves visibility, accessibility, or freshness.
A pantry doesn’t need to look like a styled photo shoot to function well.
Putting Food Waste Too Far From the Prep Area
Convenience is what makes a system stick.
The 15-Minute Reset That Helps This System Last
You shouldn’t have to completely reorganize your kitchen every month.
Try a quick reset instead.
Once a Week
- Straighten the main utensil drawer
- Return misplaced tools
- Empty and clean the food-waste container as needed
Once a Month
- Pull pantry bins forward
- Check what is getting low
- Move older food to the front
- Remove anything expired or no longer useful
Every Few Months
Ask one question:
Is this system still working for how we actually live?
If not, adjust it.
Good organization should adapt to your life—not require you to change your life to maintain it.
The Simple 3-Zone Kitchen Plan
If your whole kitchen feels overwhelming, don’t start with everything.
Do this:
1. Fix One Drawer
Empty it, categorize it, remove duplicates, and create usable zones.
2. Fix the Deepest Pantry Shelf
Use clear bins or pull-forward storage so food stops disappearing.
3. Create One Convenient Food-Waste Station
Place it close enough to your prep area that using it feels automatic.
That’s enough to make a real difference.
Final Thought: Organize the Friction, Not Just the Stuff
The most useful kitchen organization isn’t about making every shelf look perfect.
It’s about noticing where your kitchen creates friction and solving that specific problem.
A drawer should help you find the tool you need.
A pantry should help you see the food you already have.
A food-waste station should make cleanup easier while you’re cooking.
When those three areas work, your entire kitchen can feel more organized—even if you haven’t touched every cabinet.
Start small.
Fix the places that annoy you most.
That’s usually where the biggest difference happens.